

 Contributed to Content Marketing Institute, Recruiter.com, Startups.com, and dozens more publications
I have great news:
We recently acquired the domain name intergrowth.com and migrated our website from our old URL, inter-growth.co.
The business owners reading this surely understand how thrilled I am.
Even better, we were able to migrate our domain with a minimal impact on our organic traffic and keyword rankings.
We’ve worked on dozens of domain migration projects. Assuming you “check the boxes,” they are nothing to fear.
Here’s our domain migration SEO checklist to help you minimize traffic loss.
Our Domain Migration SEO Checklist
Every domain migration is different, but this SEO checklist can help you protect your keyword rankings and search traffic during the weeks following your site transfer:
- Plan for a marginal drop in traffic
- Back up essential website data before you migrate
- Block search engines from crawling or indexing your staging site
- …but don’t forget to update your crawlability settings after the migration
- Map out your redirects (and avoid redirect chains)
- Be consistent with your redirect formatting
- Map all third-party tools to your new domain
- Consider using the migration as an opportunity to roll out subfolders
- Run a post-migration audit to scan for potential problems
- Update your sitemap to reflect your new site
- Use Google Search Console to tell Google about your new domain
- Update any internal links pointing to your old domain.
- Update your social media channels (and other third-party profiles)
- Try to update any valuable external backlinks
Keep reading to learn why each of these tasks is crucial to a successful migration.
1. Plan for a Marginal Traffic Drop
Even with a sound migration plan in place, you’ll likely see at least a 10% decrease in search performance during the weeks after your migration.
Why?
Because it usually takes 4-6 weeks for search engines to index your new site and to evaluate its trustworthiness. You may temporarily lose some keyword rankings during that time.
Make sure to set these expectations for yourself and adjust your benchmarks accordingly. Set expectations with any other project stakeholders (bosses, clients, etc.), too, so that no one is disappointed when they see a traffic drop.
2. Back Up Essential Website Data Before You Migrate
A website backup is a form of insurance for your website, but it can also help you to protect your existing rankings.
So before you do anything else, download Screaming Frog to export a copy of all your site’s URL data.
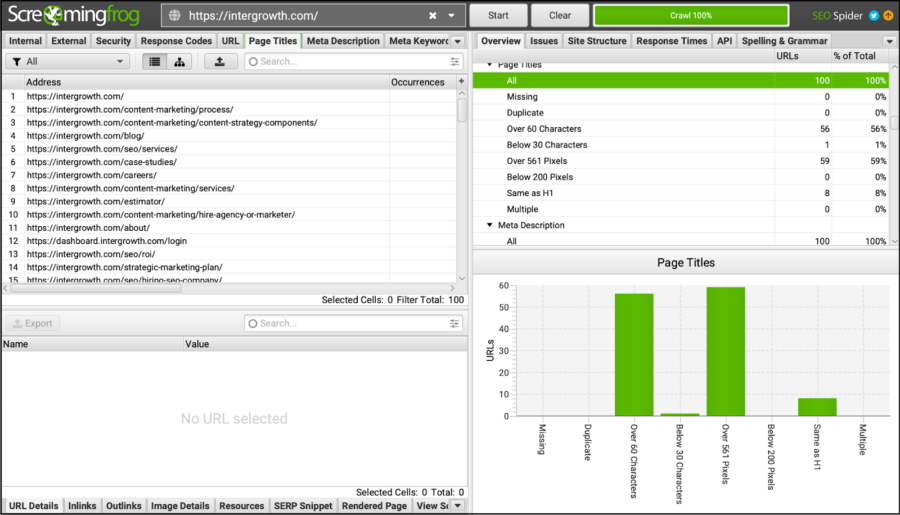
This file will give you a record of some of the most important SEO-related elements on your site, including:
- Title tags
- Meta descriptions
- URL structures
- HTTP status codes (301 redirects, etc.)
- Canonicalization settings
- Indexation rules (nofollow or dofollow links, etc.)
All of this information plays a role in your SEO strategy. Title tags, for instance, tell search engines which searches to include each page in, and your indexation rules tell search engines whether you even want a page to appear in searches.
If any of that information were lost during your domain migration, your search performance could see a big impact.
Case in point: One of our clients came to us about six months after they launched their new website. It looked great, but their total site revenue had dropped significantly since the launch.
We dug deeper and found that a lot of their metadata — namely title tags and meta descriptions — had not been copied over to the new site. We helped them create new metadata, but by the time it went live, they’d probably lost out on six months of peak organic revenue.
If their previous web dev agency had taken a copy of this, it would have cost half as much and taken half the time to re-implement these settings.

3. Block Search Engines from Crawling or Indexing Your Staging Site
If your domain migration involves a staging site, you have to take steps to ensure that your staging site doesn’t appear in search results.
Otherwise, your staging site could start ranking for keywords. It could even steal traffic from other pages on your site (or bump some pages from search results entirely).
There are a few ways to prevent search engines from including your staging site in searches:
- Modify your robots.txt file
- Implement “noindex” tags
- Set up a browser authentication window
Let me talk a bit more about each of these strategies:
How to Modify Your Staging Site’s Robots.txt File
Your robots.txt file is a page on your website that tells search engines which pages they are and aren’t allowed to analyze (or “crawl”).
If you don’t have a robots.txt file (or don’t “disallow” any pages), search engines will crawl every single page on your website.
You can usually access this file by typing /robots.txt after your domain name, like this:

And the page itself typically looks something like this:
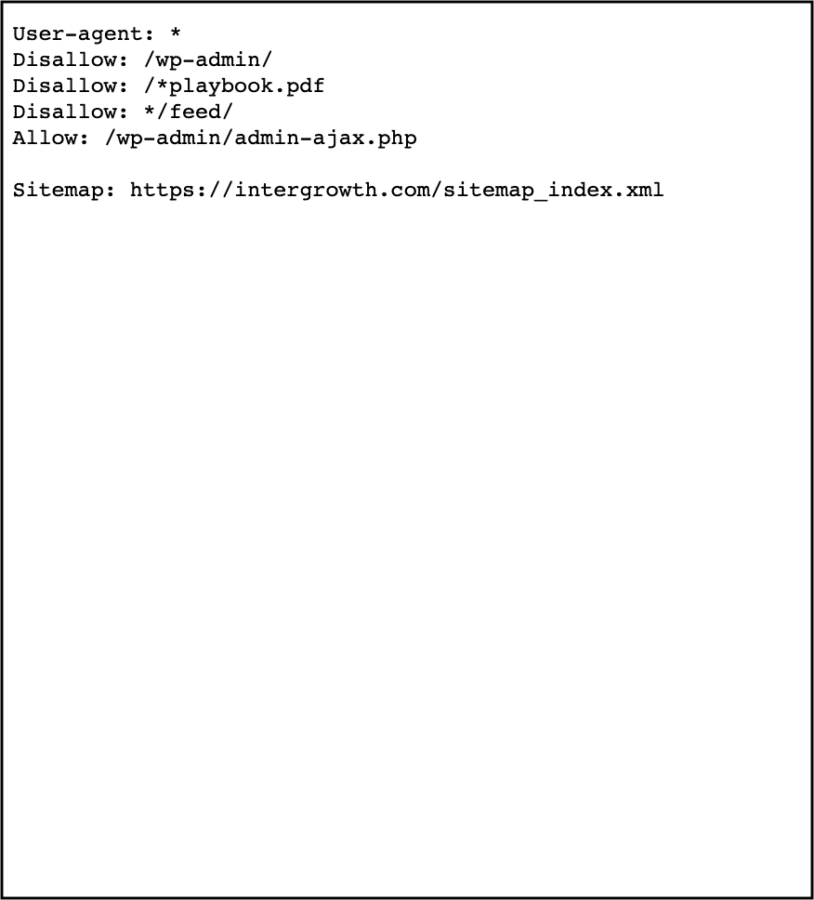
On a non-staging site, you’d create a Disallow line for every page you wanted to block search engines from crawling.
On a staging site, you can simply add one Disallow line with a forward slash (Disallow: /). This will prevent search engines from crawling any page on your staging site.
Tip: On WordPress sites, editing your robots.txt file is straightforward with SEO plugins like Yoast. However, most CMSes will also allow for customization of your robots.txt file.
How to Implement “noindex” Tags on Your Staging Site
Google may disregard your robots.txt file in some cases. You can take the extra step of setting “noindex” directives to guarantee that your staging site doesn’t appear in searches.
On a live site, you’ll usually de-index pages individually. With a staging site, it’s better to use your site’s meta robots to set up sitewide rules to prevent search engines from indexing it.
Browser Authentication Windows for Staging Sites
A browser authentication window is a page where users have to enter a username and password to view, like this:
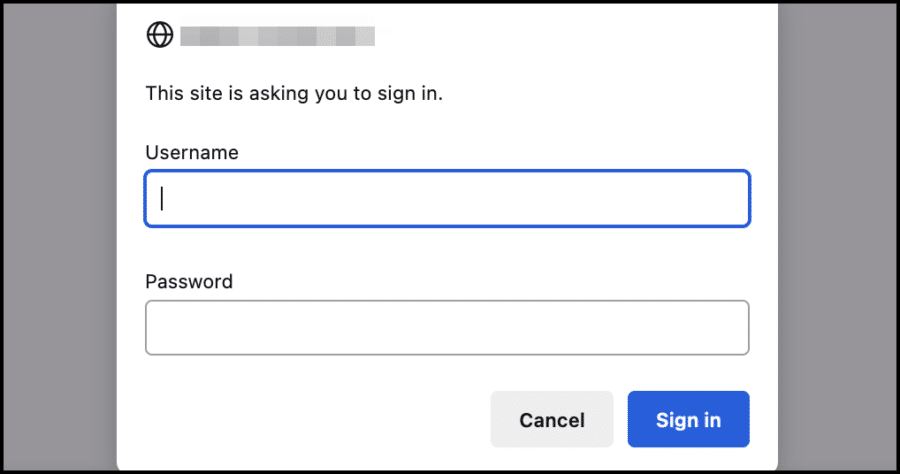
Search engine crawlers can’t access these types of pages because they don’t have the necessary credentials.
These pages render a 401 status code, preventing them from appearing in search results.
4. … but Don’t Forget to Update Your Crawl/Index Settings After the Migration
This step is very important:
Once your new site/domain goes live, you have to reverse any changes you made to the indexation settings.
In other words, if you block your staging site from getting crawled, it will carry over the same settings when it goes live. You need to reset those settings if you want the new site to appear in searches.
This means that you need to update the following:
- Robots.txt file: Only list the specific pages you want to block Google from crawling.
- Meta robots: Remove any sitewide noindex tags. Only use them on the pages you don’t want to appear in search results.
- Browser authentication windows: Take them down if you want search engines (and human site visitors) to see your site
5. Map Out Your Redirects (and Watch Out for Redirect Chains)
If you’re changing any URLs at all (i.e., not just transferring one entire domain to a new one), you should map out all of the pages you’re redirecting.
Here’s a snippet of our redirect map from when we migrated our domain from inter-growth.co to intergrowth.com:
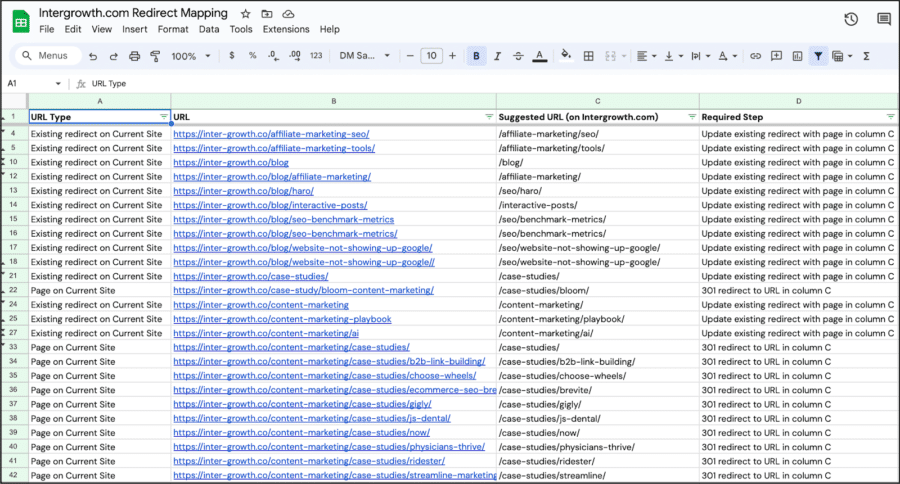
Our map tracks a few details about each URL:
- The existing URL
- The future or suggested URL
- The URL’s current redirect status (do we need to create a new redirect or replace an existing redirect on the old website?)
- Required steps needed to redirect
This document will help you visualize your website’s new architecture and keep track of your migration process.
It will also help you to avoid redirect chains, which is important for SEO.
Understanding Redirect Chains
A redirect chain exists when one page redirects to an already redirected page.
So, for example, let’s say you already had some redirects on your website before you even started thinking about a domain migration.
Maybe one of those redirects looks like this before your migration:
www.yourwebsite.com/your-10-favorite-colors
→ redirects to →
www.yourwebsite.com/favorite-colors
If you decide to migrate your entire website to www.yourNEWwebsite.com, then that old redirect could end up looking like this:
www.yourwebsite.com/your-10-favorite-colors
→ redirects to →
www.yourwebsite.com/favorite-colors
→ redirects AGAIN to →
www.yourNEWwebsite.com/favorite-colors
While Google claims that redirects don’t cause a drop off in PageRank (Google’s measurement of page importance). However, this is heavily disputed.
In my experience, each level of redirects results in a 5-10% dropoff in page authority, which leads to worse rankings and less organic search traffic.
Regardless, fewer redirects is better for both search performance and user experience.
6. Maintain Consistent Redirect Formatting
There are lots of ways to type a domain into a browser:
- intergrowth.com
- intergrowth.com/
- www.intergrowth.com
- www.intergrowth.com/
- www.intergrowth.com/home
- https://intergrowth.com
While any of those would get you to our website just the same, it’s important to use the same variant for every redirect you establish. In other words, let’s say that you want to set up this redirect:
www.yourwebsite.com/home
→ redirects to →
https://www.yourwebsite.com/
In that case, you should make sure to use this same formatting (“https://” before and “/” after) for every URL on your website.
We call this the “All Roads Lead to One” methodology. It helps to prevent unnecessary redirects to keep your website loading as fast as possible (which, again, will help your SEO in the long run).
7. Consider Rolling Out Subfolders
While we’re on the topic of redirects, I’d recommend taking this opportunity to roll out content subfolders if you don’t have them already.
Subfolders, also known as subdomains or silos, are a way to group content thematically.
For instance, we have a /SEO/ subfolder on our site that houses all of our SEO-related content. We also have a /content-marketing/ subfolder that houses content related to content marketing.
Examples:
- https://intergrowth.com/content-marketing/
- https://intergrowth.com/content-marketing/benefits/
- https://intergrowth.com/content-marketing/content-team/
- https://intergrowth.com/seo/
- https://intergrowth.com/seo/insurance/
- https://intergrowth.com/seo/accountant/
Why is this type of site structure helpful for SEO?
Because it helps search engines to understand your expertise.
Search engines like Google want to point their users to the most authoritative sites on the internet. This type of site architecture is a way to show Google — in a very organized manner — that you’re an expert in all of these different subtopics.
Related: How to Refresh Old Blog Posts for Better Performance
8. Map All Third-Party Tools to Your New Domain
Make sure to update any plugins or tools to reflect your new domain.
A few examples of tools to update:
- reCAPTCHA you have set up on form submissions
- Email automations that trigger when a user submits a form on your site
- Your email marketing client (if migrating to a new email domain)
Leaving the old domain there could affect the functionality of your conversion tracking tools or even lead to a drop-off in conversions altogether.
9. Run a Post-Migration Site Audit
After you’ve migrated your domain, run through a post-migration site audit that includes the following steps:
- Confirm that your robots.txt file isn’t preventing Google from crawling your live site.
- Use a tool like Redirect Checker to confirm that all redirects work properly and that redirect chains have been removed.
- Pull another Screaming Frog report to confirm the following:
- No unwanted noindex directives or 404 response codes
- No broken links
- No canonical tags associated with the staging site
- All pages have title tags and meta descriptions
Some of the issues that Screaming Frog points out might be intentional (ex., you might want to noindex certain pages). Unwanted issues could hurt your site’s search performance, so take a few minutes to scan this report and address any issues.
10. Update Your Sitemap to Reflect Your New Site
An XML sitemap is a document on your website outlining your architecture to help search engines crawl it more efficiently. It lists all of the most important pages on your website to show Google how the various pages relate to one another so they can index each page accordingly.
After a domain migration, update your sitemap to reflect the new pages and URLs on your site. You can use a plugin like Yoast to edit your sitemap and submit it to Google through Google Search Console for indexing.
11. Use Google Search Console to tell Google About Your New Domain
GSC’s Change of Address tool allows you to tell Google about your domain change so that your new domain will appear in search results.
It’s an easy-to-use feature that’s accessible through the Settings tab in GSC.
Check out this guide from Google to learn how to change your address through GSC.
12. Update Any Internal Links Pointing to Your Old Domain
You likely have some internal links on your website that point to other pages on your website. If you pulled those over from the old domain, those links probably point to those pages’ old URLs.
Consider updating those links with new URLs. It can reduce redirects and help your pages load faster, improving the overall user experience and can help your SEO.
13. Update Your Social Media Channels (and Other Third-Party Profiles)
Your social media channels Facebook, Instagram, TikTok, etc.) probably still link to your old domain. Take a few minutes to update all active profiles.
Also, update your Google Business profile and any customizable listings on third-party websites (like industry directories).
14. Try to Get Any External Backlinks Updated
If you have the time, consider reaching out to any outside websites that have linked to your site in the past.
This isn’t always possible, especially if you have thousands of backlinks pointing to old pages.
However, there may be instances where you happen to know the person who linked back to you. Maybe it’s a local website that covered your business, or perhaps you even sponsored an event and the website shouted you out.
Whatever the case, pull up a list of your backlinks and scan to find the ones you can change. Again, it’s not the end of the world if you can’t get them updated — they’ll still redirect to your new site — but your site speed and SEO could benefit from it.
Planning a domain migration (or trying to improve your site performance after a domain migration)?
We might be able to help!
Schedule an SEO consultation with our team today, and we’ll take a look at your site to see what we can do.
SCALE YOUR ORGANIC TRAFFIC
Subscribe to our monthly newsletter
